Showing posts with label pantry staples. Show all posts

Wednesday, April 30, 2014

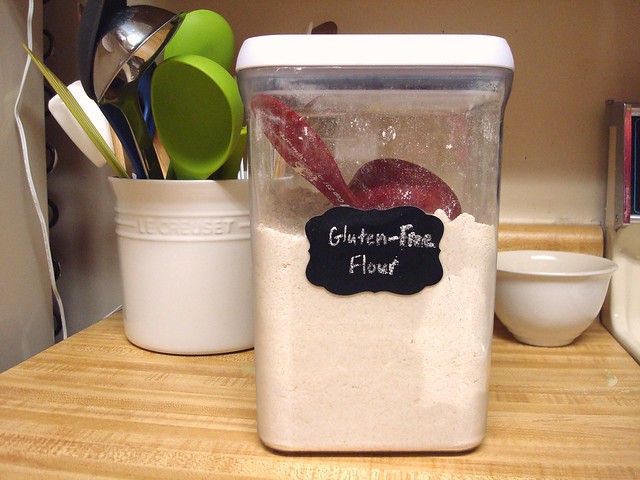
Gluten-Free Multi-Grain Flour Blend


.


     Although this gluten-free flour blend works in most recipes that call for whole wheat flour or whole white wheat flour, it is not an exact substitute.  All the recipes on my blog that list multi-grain flour blend as an ingredient have been tested.  Trial and error along with experimentation may be needed in recipes outside of this blog.  This flour blend is referred to as multi-grain instead of whole grain because it is a blend of 73% whole grains and 27% starches.  I have played around with alternate flours including brown rice, millet, sweet white rice, and buckwheat, but oat, sorghum, and arrowroot are my favorite.  If you don’t own a scale, don’t fret.  I simply dump a bag of each of these into my mixer and whisk together to blend.  Of course I cannot take credit for this ingenious flour blend myself.  I had a little help from another blog post by Gluten Free Girl and the Chef.

     Be sure to check out recipes on the blog that include this flour.  If you are not gluten-free, try substituting whole wheat or whole white wheat flour.  I would love to hear if a recipe worked using the gluten alternative, since many of them were adapted from recipes that originally included a gluten flour.  


Ingredients
  • 22 ounces (624 grams) whole grain oat flour
  • 22 ounces (624 grams) sweet white sorghum flour
  • 16 ounces (454 grams) arrowroot starch

Directions
  1. Whisk together the oat flour, sorghum flour, and arrowroot starch.  Store in a large (5 pound capacity) container in the refrigerator.  Use in place of whole wheat flour or whole white wheat flour.  

Saturday, May 18, 2013

Sweet Potato Muffins

.


    Finding a way to eat healthy food inexpensively is challenging.  I face this obstacle weekly as a plan our menu and make out the grocery list.  Honestly, it can be very frustrating.  Sometimes I have to take a break from menu planning because I can’t get the numbers and the food to line up.  There are so many things I want to make but eggs, butter, and fresh vegetables add up quickly.  Our newest challenge of eating local has stretched the budget even thinner.  Why yes, we would love to have fresh broccoli for supper, but not at $4.00 a pound.  One week I did cave and buy half a pound.  I then proceeded to burn it while it roasted in the oven.  Whoops.  We have been purchasing the majority of our produce from Snow’s Bend, a local farm in Coker that uses organic farming practices.  Although the broccoli I just mentioned sounds expensive, you would pay much more for the same amount of organic broccoli at Publix.  This week we ate swiss chard, bok choy, turnip greens, butter lettuce, romaine lettuce, and onions.  All of which were so fresh and full of flavor - flavor that could never be imitated in grocery store produce.  This sounds silly, but I told J.T. that I feel like Julia Child shopping at the market.  I am currently reading her memoir, My Life in France, (which I picked up on our recent trip to see her kitchen!) and she shopped the markets on the streets of Paris for the freshest fruits, vegetables, meats, and seafood.  I am fascinated by that woman.  
    Onward to the point of this entire blog post: sweet potato muffins.  I will confess that these sweet potatoes were purchased at Publix.  Sweet potatoes are out of season and there were none to be found at the market.  One of the many things I love about sweet potatoes is that they are inexpensive.  Even at full price they are a mere $0.99 a pound and they are classified as one of the clean 15 vegetables.  I made a dozen of these as a gift to my Mama on Mother’s Day.  My mother graciously shared them, so we all had one topped with ice cream for dessert.  Everyone thought they were delicious and I agree.


Ingredients
  • 1 ½ cups whole grain gluten-free flour blend
  • 1 teaspoon baking soda
  • ¼ teaspoon baking powder
  • ½ teaspoon kosher salt
  • 1 teaspoon cinnamon
  • ½ teaspoon nutmeg
  • ½ cup pure clover honey
  • ½ cup virgin coconut oil
  • 2 eggs, at room temperature
  • ½ teaspoon vanilla
  • 1 ½ cups mashed, roasted sweet potatoes, about 1 pound


Directions
  1. Preheat the oven to 350 degrees and line a 12-cup muffin tin with liners.
  2. In the bowl of a mixer fitted with a paddle attachment, stir together the flour, baking soda, baking powder, kosher salt, cinnamon, and nutmeg.  
  3. In a large glass liquid measuring cup, whisk together the honey, coconut oil, eggs, and vanilla.  Pour the wet ingredients into the mixing bowl and mix on low speed until just combined.  Fold in the sweet potatoes.
  4. Divide the batter equally among the prepared muffin tin.  The cups will be fairly full.  Bake for 18 to 20 minutes, or until a pick inserted into the middle comes out clean.  Yields 12 muffins. Cool completely.  Refrigerate for up to 5 days or freeze for up to 3 months.  
* I made my own gluten-free whole grain flour, but you can also substitute whole wheat flour.   The recipe behind my whole grain flour blend came from here.  I used the following ratios:
·         350 grams buckwheat flour
·         350 grams oat flour
·         300 grams arrowroot flour
This flour recipe makes more than what is required for this recipe.  Store any extra in the refrigerator.  

Saturday, May 11, 2013

J.T.’s Brownies


.


     I have been on a brief hiatus from my blog, but I am trying to get back into the swing of things.  It dawned on me earlier today that I don’t have to take a picture of every single step of a recipe.  Editing pictures, styling food, and trying to make your blog look halfway decent for readers (or reader...thanks Mama!) is time consuming.  A picture of the finished product should suffice as a blog post, so that is my new strategy.  
     My latest obsession is the farmers market.  For months I have been talking about doing a new experiment, where we only eat the vegetables that come from the market.  This forces us to eat local, try new things, and live by the seasons.  For example, right now greens are in season - collards, mustard greens, bok choy, swiss chard, and on and on.  J.T. and I are eating vegetables we have never tasted.  I am sick of washing greens, but the summer crops will be in soon.  Vegetables really do have more flavor when they are eaten in season.  We still do our weekly trip to Publix for milk, oats, cereal, bananas, and a few other pantry staples, but meat, pork, eggs, and vegetables are all purchased at the market.  Now, a little bit about these brownies.
     It is no secret that my husband loves desserts - especially anything topped with ice cream.  These brownies have been a regular staple in our freezer over the last year.  I originally stumbled across this recipe while looking for a dessert that required very few ingredients and was inexpensive to make.  Over the years, I have adapted it to better fit our real food diet. I am in no way proclaiming that these brownies are healthy - they do have over a cup of sugar in them.  I was able to swap all-purpose flour for white whole wheat flour, which does qualify for making them a bit more nutritional.  Butter or coconut oil can be used interchangeably in this recipe, so if you do not have coconut oil, use butter.  Once again, I love that these brownies can be frozen.  Simply individually wrap them in saran wrap and place in a freezer safe Ziploc bag.  I like a fully stocked freezer, see...

DSC08732

Ingredients
  • 1/2 cup cocoa powder plus 1 ½ tablespoons
  • ½ cup coconut oil plus 3 ½ tablespoons
  • 1 ⅓ cups pure cane sugar
  • 2 large eggs
  • ½ teaspoon kosher salt
  • 1 teaspoon vanilla
  • ⅔ cup whole white wheat flour


Directions
  1. Grease a 9 x 9 inch square baking pan with coconut oil and preheat the oven to 350 degrees.  
  2. In a medium sized bowl, stir together the cocoa powder and coconut oil.  Stir in the sugar, eggs, kosher salt, and vanilla.  Very slowly stir in the flour until all the ingredients are incorporated together.  The batter will be fairly thick.  Spread the batter into the prepared baking pan.  Bake for 22 to 25 minutes.  I always err on the side of under baked brownies.  Let the brownies cool slightly in the pan before cutting into squares and removing to a wire rack to cool completely.  Yields 9 large brownies or 16 small (for J.T. it makes 9).  These brownies can be individually wrapped and frozen.  Reheat in the microwave for 30 seconds.  

Tuesday, March 19, 2013

Whole Wheat Graham Crackers

DSC08268

    My how I have missed my cooking blog over the last few weeks!  A new full-time job plus a crashed computer hard drive equals no blog posts.  My sweet husband has been a saint and taken care of my computer issues.  I cannot count how much time he spent at the computer store getting my documents, pictures, and music recovered.  From now on, I will be backing my files up on another device.  Lesson learned :)  Also, my very gracious father gave me his old laptop computer which he no longer needed.  For $75 I have a new (used) computer with all my old files loaded on it.  
    I have yet to figure out a good balance between working, cooking, cleaning, laundry, and blogging.  Out of everything that must be done I know that blogging is not an absolute necessity, although, I do enjoy this creative outlet and miss it terribly.  For now I will leave you with these graham crackers.  They have become a new pantry staple in our household for J.T.  He prefers to eat them with peanut butter or ice cream (or both).  I have adapted the original recipe from The Homemade Pantry by substituting all whole white wheat flour and butter.  This removes the white refined flour and shortening - two things I avoid.  Before adapting the recipe, I followed the original version.  J.T. cannot tell a taste or texture difference between the two recipes.  I will warn you that these crackers are hard work.  Rolling the dough out takes some serious arm muscle power.  I hope to eventually adapt this to a slice and bake recipe, but for now the workout will not kill me.  One of the main reasons I love this recipe is that it can be made in advance and frozen.  You can then pull out however many you need and recrisp them in a 375 degree oven for 3 minutes.


DSC08200 DSC08202 DSC08204 DSC08205 DSC08209 DSC08212 DSC08249 DSC08250 DSC08254 DSC08257 DSC08266


Ingredients

  • 2 ¼ cups whole white wheat flour
  • ½ teaspoon kosher salt
  • ½ teaspoon baking powder
  • ¼ teaspoon baking soda
  • 1 teaspoon cinnamon
  • ¼ cup brown sugar
  • 7 tablespoons butter, chilled and cut into cubes
  • ¼ cup cold water
  • 4 tablespoons honey
  • 2 teaspoons vanilla


Directions

  1. In the bowl of a heavy duty mixer fitted with a paddle attachment, mix together the flour, salt, baking powder, baking soda, cinnamon, and brown sugar on low speed until everything is combined.  Add the chilled butter.  Start at the lowest speed possible and bring the speed of the mixture up gradually to a medium high.  Beat the dry ingredients and the butter until the mixture resembles a coarse texture.  
  2. In a small glass measuring cup, stir together the water, honey, and vanilla.  With the mixer on low speed, slowly pour the wet ingredients into the dry.  Gradually increase the speed of the mixer until the dough begins to come together.  The dough will be crumbly but should hold together.  Roll the dough into a ball and wrap it in wax paper.  Refrigerate for at least 2 hours (or the dough can be frozen at this point).  
  3. Set the dough out of the refrigerator for one hour before you begin rolling it out.  Lightly flour two pieces of wax paper.  You will be rolling the dough out on a large dough board or pastry mat between the two pieces of floured wax paper.  Divide the dough ball into quarters (it is easier to work with smaller amounts of dough at a time).  Roll the dough ⅛ to ¼ inch thick.  Use a 3-inch biscuit cutter to cut out the crackers (or you can attempt to make perfectly symmetrical squares).  Place the cut out dough on ungreased cookie sheets.  Using a fork, poke several holes in the top of each cracker.  Bake at 350 degrees for 11 to 12 minutes.  Yields about 32 crackers.  Remove the crackers to a wire rack to cool completely before storing.  Keeps for up to one week in the pantry and for three months in the freezer.  

Thursday, February 28, 2013

Banana Muffins

DSC07876


     I love bananas.  In fact, I eat one every day for a snack.  Being the frugal cook that I am, I also love the fact that bananas are a cheap fruit.  Once a week, I pick up a bunch of organic bananas at Publix for $0.99 a pound.  This entire bunch costs me around $2.50 but normally a little less.  I always buy seven bananas because this gives me one for everyday of the week and this makes for a cheap snack at $0.37 per banana.  On occasion bananas brown and become very ripe before I have a chance to eat them.  When this happens, I peel the banana and freeze it.  Once I have two overripe bananas in my freezer, I make these banana muffins.  I mainly make these muffins for myself.  J.T. absolutely loves Pumpkin muffins and Sweet Potato muffins so I keep our freezer stocked with those for him to eat.  In my opinion, mini muffins are easier to eat while working at a desk, so that’s why I like the smaller size.  These banana muffins are fairly low in sugar, because I do not care for overly sweet muffins which taste more like a cupcake than a muffin.  Since bananas are naturally sweet, it doesn’t take much honey to sweeten the batter.  I store these in the freezer and every morning I put two in a container to take to work.  By mid morning the muffin has defrosted but you can microwave it for 20 seconds to rewarm it instantly.   


DSC07862DSC07864 DSC07865 DSC07866 DSC07868 DSC07870DSC07871 DSC07872 DSC07874


Ingredients
·         1 ½ cups gluten-free whole grain flour blend*
·         1 teaspoon ground cinnamon
·         ½ teaspoon ground nutmeg
·         1/8 teaspoon ground allspice
·         1 teaspoon baking soda
·         ¼ teaspoon baking powder
·         ½ teaspoon salt
·         ½ cup coconut oil
·         ¼  cup honey
·         ¼ cup almond milk
·         ½ teaspoon vanilla
·         2 eggs
·         1 cup over ripened mashed bananas (about 2)

Directions
1.      Preheat the oven to 350 degrees and grease (or use cupcake liners) a 24-cup mini muffin tin or a 12-cup muffin tin. 
2.      In a large bowl, whisk together the flour, cinnamon, nutmeg, allspice, baking soda, baking powder, and salt.  In a small glass measuring cup, whisk together the coconut oil, honey, vanilla, and eggs.  Make a well in the center of the dry ingredients.  Pour the wet ingredients into the dry ingredients and stir until just combined.  Fold in the mashed bananas.  Divide the batter equally among the muffin tin.  Bake mini muffins for 8 to 10 minutes.  Remove from the oven and leave in muffin tin for 2 minutes (you may skip this step if using cupcake liners).  Move the muffins to a wire rack to cool.  Yields 24 to 28 muffins. 
You can also make these muffins using a regular size muffin tin.  Divide the batter equally among a 12-cup muffin tin and bake for 16 minutes.  Yields 12 large muffins.   
* I made my own gluten-free whole grain flour, but you can also substitute whole wheat flour.   The recipe behind my whole grain flour blend came from here.  I used the following ratios:
·         350 grams buckwheat flour
·         350 grams oat flour
·         300 grams arrowroot flour
This flour recipe makes more than what is required for this recipe.  Store any extra in the refrigerator.  

Wednesday, February 20, 2013

Brown Sugar & Cinnamon Instant Oatmeal

DSC08043


     A while ago, I got on my soapbox about milk and cereal being very pricy.  A gallon of Publix Greenwise organic milk retails for $5.99 and a 14 ounce box of Publix Greenwise organic toasted oats cereal costs $3.79.  J.T. likes big bowls of cereal and there is nothing tiny about the amount of milk he drowns his cereal in either.  Two boxes of cereal and a gallon of milk were costing $13.57 a week! This doesn’t include the ½ gallon of almond milk and container of oats I buy for my breakfast each week.  I talked to J.T. about possibly trying instant oatmeal.  As a kid, he wasn’t fond of oatmeal.  I am not sure any kid really is unless it is loaded with sugar and a bunch of other chemicals and additives, which are junk.  Once again, my Homemade Pantry cookbook came to the rescue!  I can attest that this oatmeal is delicious.  I sometimes eat a small bowl for a bedtime snack.  J.T. will actually eat this oatmeal and he enjoys it!  I was so relieved.  J.T. has cut his milk and cereal consumption in half.  This saves a little money that can be put toward other items which we really need at the store.  After being a cold cereal breakfast consumer for years, J.T. now rotates between cereal and this instant oatmeal recipe. I am thankful for a husband that is always willing to try new things J   

DSC07705DSC07709 DSC07710 DSC07712 DSC07713 DSC07714


Ingredients
·         6 cups old-fashioned rolled oats
·         ½ cup packed brown sugar
·         1 tablespoon cinnamon
·         1 teaspoon kosher salt

Directions
1.      Preheat the oven to 325 degrees and line a large baking sheet with parchment paper.  Spread the oats out in an even layer on the prepared baking sheet.  Bake in the oven for 20 minutes.  Set aside to cool slightly.
2.      In a food processor, fitted with a steel blade, pulse together the brown sugar, cinnamon, salt, and 4 cups of the baked oats.  Pulse the mixture until it is a powdery consistency.  Mix together the pulsed oats and the remaining baked oats.  Store in a large airtight container for up to a month.  To make the instant oatmeal, combine ½ cup of oats with 1 to 1 ½ cups of water (for thicker oatmeal add less water and for thinner oatmeal add more water).  Microwave on high for 2 to 2 ½ minutes (mine takes exactly 2 minutes and 15 secondsJ).   Add a splash of milk and serve hot.  Yields 12 to 15 servings.  

Wednesday, February 13, 2013

Whole Wheat Crackers

DSC07764

     Wheat crackers, second only to the cheese crackers, are J.T.’s other favorite snack.  This recipe is adapted from my beloved Homemade Pantry cookbook, which I am still ecstatic about!  I realize that many of you are probably thinking “who in the world has time to make crackers?” My answer to this would be that Saturday and Sunday are usually a baking and cooking marathon around our house.  I also love to make double and even triple recipes of staple items.  For example, this is a double recipe of the original version published in The Homemade Pantry.  It yields approximately 140 crackers, which is about a month’s worth of cracker snacks for J.T.  He eats the cheese crackers for a snack in the morning and the wheat crackers for an afternoon treat.  I was making Homemade Wheat Thins, but after I made a batch of these wheat crackers, he was hooked.   I also LOVE this recipe because the baked crackers can be frozen.  One Saturday a month, I gather all my ingredients and get to work.  For the remainder of the month, I pull from the freezer how many crackers I need for the pantry during the upcoming week.  Then, I recrisp the crackers in the oven for 3 minutes and I’m done.  It’s that easy.  

DSC07736 DSC07737 DSC07741 DSC07740 DSC07742 DSC07744 DSC07745 DSC07747 DSC07751 DSC07749 DSC07752


Ingredients
·         4 cups King Arthur whole white wheat flour
·         1 teaspoon baking powder
·         2/3 cup whole millet, uncooked
·         2/3 cup ground flaxseeds
·         1 teaspoon kosher salt, plus more for sprinkling
·         5 garlic cloves, minced with a garlic press
·         2 teaspoons dried rosemary, crumbled
·         1 cup plus 4 tablespoons extra virgin olive oil
·         Freshly ground black pepper, from a pepper mill

Directions
1.      In the bowl of a mixer, fitted with a paddle attachment, mix together the flour, baking powder, millet, flaxseeds, salt, garlic, and rosemary.  With the mixer on low speed, slowly stream in the olive oil.  Then stream in (very slowly once again) 1 ½ cups of water, until the dough comes together.  The dough should be very easy to work with.  Dump the dough onto a floured surface and roll it out with a rolling pin to ¼ inch thickness.  Use a 1 ½ inch biscuit cutter to cut out the crackers.  Repeat this process until all the dough is used. 
2.      Line the cut out cracker dough on ungreased cookie sheets.  Not much space is required between each cracker because they do not spread.  Sprinkle with kosher salt and freshly ground black pepper.  Bake in a 350 degree oven for 18 to 20 minutes (20 minutes was perfect for my oven).  Once the crackers have baked, transfer them to a wire rack to cool completely before storing.  These can be stored in an airtight container for up to one week.  As I mentioned earlier, my FAVORITE thing about these crackers is that they can be frozen!  Store them in a Ziploc bag or freezer safe container in the freezer (up to 3 months).  Simply recrisp them for 3 minutes in a 375 degree oven.  Yields about 140 crackers. 

Wednesday, February 6, 2013

Granola Cereal

DSC07653

I have been making this granola cereal since J.T. and I made the switch to real food.  J.T. and I always eat a bed time snack, anytime between 8 and 9.  My snack of choice before our food overhaul was rice Chex cereal.  Chex cereal has an extensive line of gluten free cereals and it was nice to actually be able to purchase this cereal relatively cheaply with coupons.  Cheap was great until I realized all the ingredients on the nutrition panel where things I didn’t even recognize.  I started playing around with the idea of a granola cereal.  Most granola is fairly high in calories and a typical recipe contains oats, butter (or oil), nuts, dried fruit, and sometimes chocolate chips.  Since I am not a huge fan of dried fruit and my stomach prefers that I eat nuts in moderation, I wanted to eliminate both of these ingredients from my granola.  I also didn’t see the point in adding more sugar – the chocolate chips – to a snack that was already sugary enough.  This left me with oats and oil.  I tested batch after batch of granola cereal until I settled on something I loved.  This particular recipe has been made with more honey, with less honey, with whole grain puffed brown rice, and with whole grain puffed millet.  I like the texture of corn the best.  It is larger in size than both the rice and the millet.  This makes the oats cling better to the corn, resulting in larger clusters of granola.  I make a batch of this every week and look forward to my little bowl each night.  I eat this in ½ cup servings with a splash of almond milk poured on top.  I don’t miss the Chex cereal one bit! 

DSC07640 DSC07643 DSC07642 DSC07645 DSC07648 DSC07652 DSC07650


Ingredients
·         2 cups rolled oats
·         2 cups whole grain puffed corn, such as Arrowhead Mills
·         1 ½ teaspoons cinnamon
·         3 tablespoons coconut oil
·         3 tablespoons pure clover honey


Directions
1.      Line a large baking sheet with parchment paper.  In a large bowl mix together the oats, puffed corn, and cinnamon.  Stir in the coconut oil and honey.  Spread in an even layer on the prepared baking sheet.  Bake at 250 degrees for 75 minutes. Let cool completely.  Break apart into clusters and store in an air tight container.  Yields about 8 (1/2 cup) servings.