Wednesday, November 27, 2013

Green Pea Soup

DSC08196


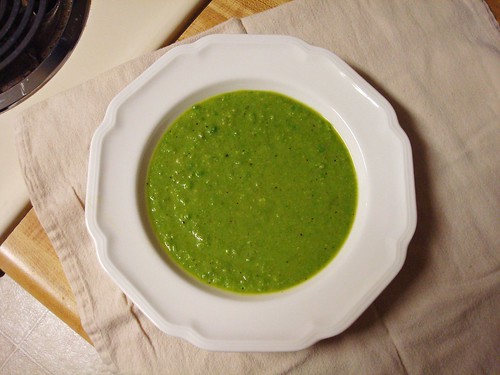
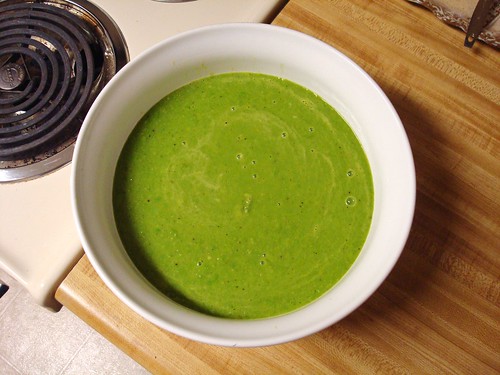
     Pea soup doesn't sound very exciting and probably wouldn't roll off the tongue of many as a favorite soup.  I will admit I was a little skeptical of pea soup, but when you can make a meal for $3.00 you begin to accept the idea of branching out.  My first trial of pea soup was just "okay" and I didn't care for it's watery consistency.  Things really changed when I decreased the liquid and increased the vegetables.  Pea soup transformed into a thick, sweet, salty, bowl of warmth, perfect for a cool winter evening.  It is one of the quickest cooking soups I have every made, plus it freezes and reheats extremely well.  

DSC08184 DSC08186 DSC08187 DSC08190 DSC08192 DSC08194


Ingredients
  • 3 tablespoons extra-virgin olive oil
  • 1 large onion, chopped
  • 4 garlic cloves, minced
  • 1 teaspoon Celtic sea salt
  • 1 teaspoon coarse ground black pepper
  • 3 (9 ounce) boxes frozen peas* (see note)
  • 2 cups chicken stock, preferably homemade
  • ½ cup water

Directions
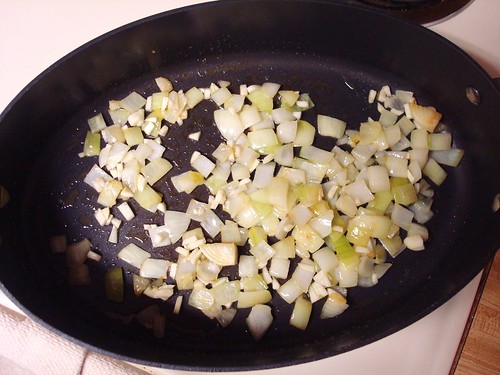
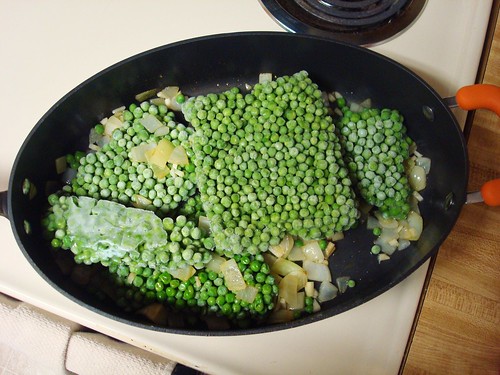
  1. Heat the olive oil in a large sauté pan over medium heat.  Add the onions and cook until very tender, about 15 minutes.  Add the garlic, sea salt, and pepper and cook for 30 seconds, or until the garlic becomes fragrant.  Add the frozen 
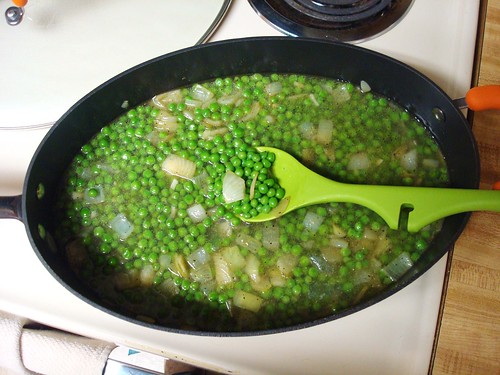
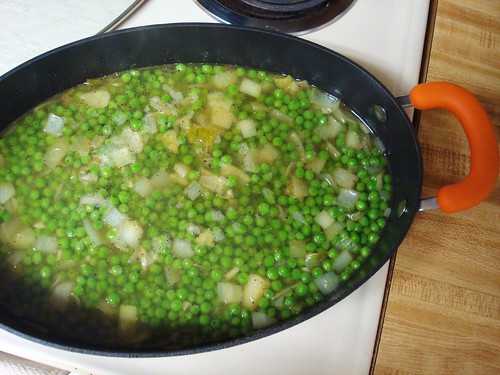
peas, chicken stock, and water.  Bring to a boil, cover, reduce the heat, and simmer for 20 minutes.  
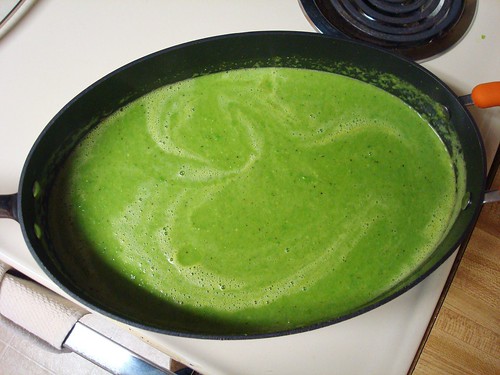
  2. Once the soup has cooled slightly, use an immersion blender to coarsely puree the soup.  Leaving a few whole peas in the soup will be just fine.  Serve immediately or cool slightly before refrigerating.  

*Note:  I use Green Giant brand frozen boxed steamer peas in this recipe.  The peas have salt, sugar and baking soda added.  If you choose to use plain frozen peas, you may need to increase the salt by ½ to 1 teaspoon.  Additionally, adding a ½ teaspoon of sugar will sweeten the peas.


Make ahead:  Prepare the recipe as directed above and refrigerate or freeze.  If refrigerating, reheat the soup over medium heat for 25 minutes, stirring occasionally to prevent any peas from sticking to the bottom of the pot.  If freezing, defrost completely in the refrigerator before reheating.  Refrigerate up to 5 days and freeze up to 3 months.  

Monday, November 25, 2013

Menu Plan, November 24 - 30

     The weekend always flies by and time seems to disappear.  I loved every moment I spent in the kitchen this weekend and had fun creating a few of my favorite classic dishes.  I will admit I was quite nervous about making the pop tarts, since I was attempting to make them gluten and dairy free.  Surprisingly, they turned out great and I couldn't have been happier.  They were especially fun to eat!  I hope to have the recipe on the blog soon. With this being Thanksgiving week, my feast preparation has begun.  I am looking forward to my favorite food day!

Sunday
  • Chicken Pot Pie
  • Sauteed Broccoli and Carrots
  • Homemade Strawberry Poptarts
Monday
  • Pea Soup
  • Whole Grain Corn Muffins
Tuesday
  • Veggie Burgers on Cornmeal Waffles Cakes
  • Sweet Potato Fries
Wednesday
Friday
  • Leftovers

Friday, November 22, 2013

Sweet Potato Puree

DSC07637


     Fall vegetables seem to be my current focus on the blog lately.  My favorite vegetable of all time, during any season, is the sweet potato.  Rachael Ray has stated many times that the sweet potato is the most nutrient dense vegetable you can purchase in the grocery store.  While I am not sure if this is 100% accurate, I certainly would like to think that she is correct.  My love for sweet potatoes developed at an early age, when my grandmother introduced me to sweet potato soufflé.  We lived far away and would travel to see her around the holidays.  It never failed that she always made her delicious sweet potato soufflé, topped with brown sugar and pecans.   As we said our goodbyes, she would hand me a small carryout container to snack on during the drive home.  Most kids like candy, chips, Little Debbie’s and various other junk foods.  I prefer the sweet potatoes and have never quit loving them to this day.  The recipe below is a variation of a recipe in Ina Garten’s latest cookbook, Foolproof.  While it isn’t my grandmother’s soufflé, it is a lighter twist on my favorite vegetable that can be served any time of the year.  


DSC07621 DSC07623 DSC07625 DSC07627 DSC07628 DSC07629 DSC07630 DSC07633 DSC07634 DSC07638


Ingredients
·         3 pounds sweet potatoes, peeled and cut into 1-inch chunks
·         ¾ cup almond milk
·         ½ cup coconut oil
·         ½ cup freshly squeezed orange juice
·         2 teaspoons kosher salt
·         ¼ teaspoon black pepper

Directions
1.      Place the sweet potatoes in a steamer and steam for 25 minutes, or until very tender.  Move the potatoes to the bowl of an electric mixer fitted with a paddle attachment.  Add the almond milk, coconut oil, orange juice, salt, and pepper.  With the mixer on low, blend together for 10 minutes.  The sweet potatoes should be very smooth.  To keep warm or to reheat, place the sweet potato puree in a bowl over a pot of simmering water.  Yields 6 servings.  


Sunday, November 17, 2013

Menu Plan, November 17 - 23

You may begin noticing a trend with my weekly menu plans.   Trends such as:

  1. I normally serve soup on Monday night during the fall/winter. 
  2. We always have veggie burgers on cornmeal waffle cakes with some form of vegetable "fry" on Wednesday night.  We have to eat by 5:45 on Wednesday nights, because J.T. has to leave for church at 6:15.  I do not arrive home from work until 5:15, so most of this meal must be done in advance.  About once a month, I make the veggie burgers in large batches of 16, which provides each of us with 4 lunches and 4 suppers.  I freeze the burgers in batches of 4 and defrost them overnight in the refrigerator, the night before I plan to serve them.  The cornmeal waffle cakes, which serve as our bread, are made in advance too and I always have a batch of these in the freezer.  The vegetable fries are prepared by my wonderful husband.  I lay out all the ingredients, the utensils, and the recipe before I go to work.  J.T. prepares the recipe and pops the fries into the oven, since he gets home from work earlier than me.  When I arrive home, I put the veggie burgers and waffle cakes onto a sheet pan and they go into the oven for 10 to 15 minutes.
  3. We always have waffles and eggs on Friday night.  After a full week at work, I am pooped and love having something easy and fun for supper.  I make the waffles in advance and freeze them.  When I arrive home from work, I pull the waffles out of the freezer, slather them with peanut butter, and pop them into the oven for 10 minutes.  J.T. fixes the eggs and dinner is served.  This by far our favorite meal of the week. 

Sunday
  • Shepherd's Pie
  • French Lentils
  • Popovers
Monday
  • Potato Soup
  • Cornbread Muffins & Popovers
Tuesday
  • Tuna Croquettes
  • Roasted Potatoes & Carrots
Wednesday
  • Veggie Burgers on Cornmeal Waffle Cakes
  • Baked Sweet Potato Fries
Thursday
  • Mini Meatloaves
  • Rosemary White Beans
Friday
  • Peanut Butter Waffle Sandwiches
  • Fried Eggs
Saturday 
  • Leftovers


Friday, November 15, 2013

Thyme Roasted Carrots

DSC07988


          As we discussed last week, many root vegetables are too often overlooked and under served at the family dinner table.  Carrots are perfectly wonderful to serve all year around, not just at your annual holiday meal.  In fact, you can actually grow carrots all year, in your own backyard, without waiting on one particular season.  If you have picky eaters (both adults and children) who shun the carrot and think it taste like rabbit food, introduce them to the roasted carrot, also known as vegetable candy.  Carrots are the perfect roasted root vegetable.  I mentioned last week that roasting concentrates the flavor of the vegetable and caramelizes its natural sugar content. Carrots naturally contain greater amounts of sugar, and roasting this vegetable only magnifies its sweetness.  I have made these carrots for many, and some can tell no difference between the roasted carrot and the roasted sweet potato.   Try something new next week for dinner and make an effort to add roasted carrots to your upcoming meal plan.


DSC07968 DSC07970 DSC07973 DSC07975 DSC07978 DSC07983 DSC07985


Ingredients
·         2 pounds carrots, peeled, halved, and cut into 2 to 3 inch chunks
·         2 tablespoons extra-virgin olive oil
·         ½ teaspoon dried thyme
·         1 ¼ teaspoons kosher salt
·         ½ teaspoon coarse ground black pepper

Directions
1.      Preheat the oven to 400 degrees and line a sheet pan with parchment paper.
2.      In a medium sized bowl, toss together the carrots, olive oil, thyme, salt, and pepper.  Spread the carrots in one even layer onto the prepared baking sheet.  Roast for 45 to 50 minutes, flipping once, until the carrots are nicely browned.  Serves 4.  


Tuesday, November 12, 2013

Menu Plan, November 10 - 16

     Since I do not post my weekly grocery store trips anymore, I thought it would be helpful to post my weekly menu plan instead.  Many bloggers have a weekly post titled "Menu Plan Monday."  My weekly plan always begins on Sunday, because this is technically the first day of the week.  While this may be a bore for some readers, it will be helpful when I am in a pinch to come up with a meal.   Personally, I think it is interesting to see what other people eat on a daily basis.  I am the girl starring at everyone else's grocery cart wondering what they people feed their family.  Although it is a few days late, here is the plan for the week:

Sunday
Monday
  • Veggie Burgers on Cornmeal Waffle Cakes
  • Baked Sweet Potato Fries
Thursday
  • Mini Meatloaves
  • Slow Cooker Lima Beans
Friday
Saturday
  • Leftovers from the week

What are you having for dinner this week?  

Friday, November 8, 2013

Roasted Brussels Sprouts

DSC07909


     Fall is here and this means my obsession with roasted root vegetables, hearty vegetable soups, and one pot casseroles can begin.  I realize many of you think brussels sprouts are disgusting and you grew up feeding these miniature, mushy cabbages to the dog (who probably spit them out).  I would argue that brussels - roasted until the skins turn golden brown - are a delicious, salty, vegetable gem that is sadly overlooked at the weekly dinner table.  My husband hated brussels sprouts until I made these.  I wasn't particularly fond of them myself, considering I had only eaten them boiled or steamed.  Most any vegetable roasted on a tray in the oven, with olive oil and salt, will turn out wonderful.  Why?  Roasting concentrates the flavor of the vegetable and caramelizes it's natural sugar content.  Roasted carrots, butternut squash, and potatoes are favorites in our family.  Always watch the oven carefully during the last 10 minutes of cooking.  Vegetables can burn quickly!  My husband actually prefers his blackened, while I like mine golden brown.  


DSC07886 DSC07888 DSC07889 DSC07891 DSC07898 DSC07908


Ingredients
·         1 ½ pounds brussels sprouts (I normally use frozen and defrost them overnight in the fridge)
·         2 tablespoons extra-virgin olive oil
·         1 ¼ teaspoons celtic sea salt
·         ½ teaspoon coarse ground black pepper

Directions
1.      Preheat the oven to 400 degrees and line a large sheet pan with parchment paper.  In a medium sized bowl, lightly toss together the brussels, olive oil, salt, and pepper.  In one even layer, spread the brussels onto the prepared sheet pan.  Make sure they are spaced apart because this ensures that the brussels brown and do not steam.  Roast for 45 minutes, flipping once after 25 minutes.  Serves 5.